Page 248 - CITS - ED - Mechanical
P. 248
ENGINEERING DRAWING - CITS


           1  What is the thickness of the pipe?
           2  What is the thickness and diameter of the flange?
           3  What is the length of the pipe?
           4  What is the purpose of φ 75 x 6 mm circular gap in the flange?
           5  What is the distance between the φ 16 mm opposite holes?
           6  What does the dotted circle in the side view represent?

           Exercise 10.9
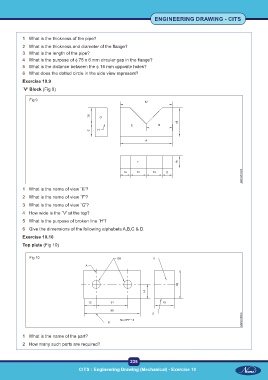
           `V' Block (Fig 9)

              Fig 9


           1  What is the name of view `E'?
           2  What is the name of view `F'?
           3  What is the name of view `G'?
           4  How wide is the `V' at the top?
           5  What is the purpose of broken line `H'?
           6  Give the dimensions of the following alphabets A,B,C & D.

           Exercise 10.10
           Top plate (Fig 10)


              Fig 10


           1  What is the name of the part?
           2  How many such parts are required?


                                                           235
                                    CITS : Engineering Drawing (Mechanical) - Exercise 10

