Page 67 - CITS - Fitter - Trade Theory
P. 67
FITTER - CITS

           Outside micrometer (metric)

           Definition of outside micrometer
           A  micrometer  is  a  precision  instrument  used  to  measure  a  job,  generally  within  an  accuracy  of  0.01  mm.
           Micrometers used to take the outside measurements are known as outside micrometers.
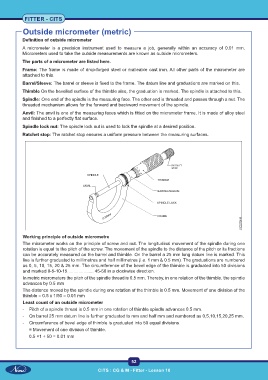
           The parts of a micrometer are listed here.
           Frame: The frame is made of drop-forged steel or malleable cast iron. All other parts of the micrometer are
           attached to this.
           Barrel/Sleeve: The barrel or sleeve is fixed to the frame. The datum line and graduations are marked on this.
           Thimble On the bevelled surface of the thimble also, the graduation is marked. The spindle is attached to this.

           Spindle: One end of the spindle is the measuring face. The other end is threaded and passes through a nut. The
           threaded mechanism allows for the forward and backward movement of the spindle.
           Anvil: The anvil is one of the measuring faces which is fitted on the micrometer frame. It is made of alloy steel
           and finished to a perfectly flat surface.
           Spindle lock nut: The spindle lock nut is used to lock the spindle at a desired position.
           Ratchet stop: The ratchet stop ensures a uniform pressure between the measuring surfaces.


           Working principle of outside micrometre
           The micrometer works on the principle of screw and nut. The longitudinal movement of the spindle during one
           rotation is equal to the pitch of the screw. The movement of the spindle to the distance of the pitch or its fractions
           can be accurately measured on the barrel and thimble. On the barrel a 25 mm long datum line is marked. This
           line is further graduated to millimetres and half millimetres (i.e. 1 mm & 0.5 mm). The graduations are numbered
           as 0, 5, 10, 15, 20 & 25 mm. The circumference of the bevel edge of the thimble is graduated into 50 divisions
           and marked 0-5-10-15..................... 45-50 in a clockwise direction.
           In metric micrometers the pitch of the spindle thread is 0.5 mm. Thereby, in one rotation of the thimble, the spindle
           advances by 0.5 mm
           The distance moved by the spindle during one rotation of the thimble is 0.5 mm. Movement of one division of the
           thimble = 0.5 x 1/50 = 0.01 mm
           Least count of an outside micrometer
           -  Pitch of a spindle thread is 0.5 mm in one rotation of thimble spindle advances 0.5 mm.
           -  On barrel 25 mm datum line is further graduated to mm and half mm and numbered as 0,5,10,15,20,25 mm.
           -  Circumference of bevel edge of thimble is graduated into 50 equal divisions.
              = Movement of one division of thimble.
              0.5 ×1 ÷ 50 = 0.01 mm


                                                           52

                                             CITS : CG & M - Fitter - Lesson 10

