Page 132 - CITS - ED - Mechanical
P. 132
ENGINEERING DRAWING - CITS


            Pipe threads


           Pipe threads are used for fastening purposes intended for mechanical assembly of components of pipe fittings,
           cocks, valves etc, where pressure type joints are not required on the threads. IS:2643 (Part 1  to 3) lays down the
           standard pipe sizes, pitch thread profile and tolerance etc.


           The (nominal) sizes are expressed as  1/8, 1/4 .....1 ...   ...6 available in 24 sizes.
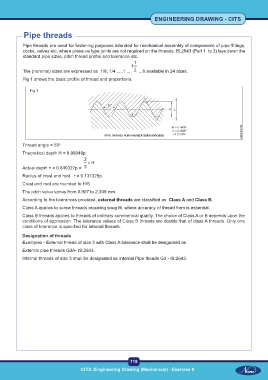
           Fig 1 shows the basic profile of thread and proportions.

              Fig 1


           Thread angle = 55 o

           Theoratical depth H = 0.96049p


           Actual depth h = 0.640327p =
           Radius of crest and root   r = 0.137329p
           Crest and root are rounded to H/6
           The pitch value varies from 0.907 to 2.309 mm.
           According to the tolerances provided, external threads are classified as  Class A and Class B.

           Class A applies to screw threads requiring snug fit, where accuracy of thread form is essential.
           Class B threads applies to threads of ordinary commericial quality. The choice of Class A or B depends upon the
           conditions of application. The tolerance values of Class B threads are double that of class A threads. Only one
           class of tolerance is specified for internal threads.
           Designation of threads
           Examples - External thread of size 3 with Class A tolerance shall be designated as
           External pipe threads G3A- IS:2643.

           Internal threads of size 3 shall be designated as Internal Pipe theads G3 - IS:2643.


                                                           119
                                     CITS :Engineering Drawing (Mechanical) - Exercise 8

