Page 201 - CITS - ED - Mechanical
P. 201
ENGINEERING DRAWING - CITS


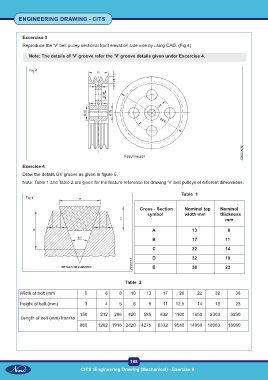
           Excercise 3
           Reproduce the ‘V’ belt pulley sectional front elevation side vice by using CAD. (Fig 4)

              Note: The details of ‘V’ groove refer the ‘V’ groove details given under Excercise 4.


              Fig 4


           Exercise 4
           Draw the details GV groove as given in figure 5.

           Note: Table 1 and Table 2 are given for the feature reference for drawing ‘V’ belt pulleys of different dimensions.

                                                                                  Table  1


                                                               Cross - Section     Nominal top     Nominal
                                                                     symbol        width mm        thickness
                                                                                                       mm

                                                                         A               13              8
                                                                         B               17            11

                                                                         C               22            14
                                                                         D               32            19

                                                                         E               38            23

                                                         Table  2

          Width of belt (mm                5    6     8    10     13     17      20      22      32       38

          Height of belt (mm)          3        4     5     6      8     11    12.5      14      19       23

                                     150      212   296   420    585    832    1100   1650    2303     3230
          Length of belt (mm) from to
                                     860    1262  1916  2820  4275     6332   9540  14050  18063      18080


                                                           188
                                     CITS :Engineering Drawing (Mechanical) - Exercise 9

