Page 324 - CITS - ED - Mechanical
P. 324
ENGINEERING DRAWING - CITS


           Components of a Dimension (Fig 1)
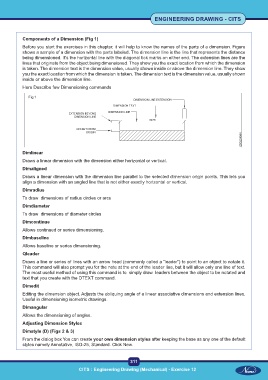
           Before you start the exercises in this chapter, it will help to know the names of the parts of a dimension. Figure
           shows a sample of a dimension with the parts labeled. The dimension line is the line that represents the distance
           being dimensioned. It’s the horizontal line with the diagonal tick marks on either end. The extension lines are the
           lines that originate from the object being dimensioned. They show you the exact location from which the dimension
           is taken. The dimension text is the dimension value, usually shown inside or above the dimension line. They show
           you the exact location from which the dimension is taken. The dimension text is the dimension value, usually shown
           inside or above the dimension line.
           Here Describe few Dimensioning commands

              Fig 1


           Dimlinear

           Draws a linear dimension with the dimension either horizontal or vertical.
           Dimaligned
           Draws a linear dimension with the dimension line parallel to the selected dimension origin points. This lets you
           align a dimension with an angled line that is not either exactly horizontal or vertical.
           Dimradius
           To draw  dimensions of radius circles or arcs
           Dimdiameter
           To draw  dimensions of diameter circles
           Dimcontinue

           Allows continued or series dimensioning.
           Dimbaseline
           Allows baseline or series dimensioning.
           Qleader

           Draws a line or series of lines with an arrow head (commonly called a “leader”) to point to an object to notate it.
           This command will also prompt you for the note at the end of the leader line, but it will allow only one line of text.
           The most useful method of using this command is to  simply draw  leaders between the object to be notated and
           text that you create with the DTEXT command.
           Dimedit
           Editing the dimension object. Adjusts the obliquing angle of a linear associative dimensions and extension lines.
           Useful in dimensioning isometric drawings.
           Dimangular
           Allows the dimensioning of angles.

           Adjusting Dimension Styles
           Dimstyle (D) (Figs 2 & 3)
           From the dialog box You can create your own dimension styles after keeping the base as any one of the default
           styles namely Annotative, ISO-25, Standard. Click New.


                                                           311
                                    CITS : Engineering Drawing (Mechanical) - Exercise 12

