Page 323 - CITS - ED - Mechanical
P. 323
ENGINEERING DRAWING - CITS


           Select objects: prompt, pick the long arc on the left side of the tub to highlight the arc. Press m to indicate that
           you’ve finished your selection.

           Specify first point of mirror line: prompt, pick the midpoint of the top horizontal line. By now, you should know
           how to use the automatic osnap modes you set up earlier.
           Specify second point of mirror line: prompt, use Polar Tracking mode to pick a point directly below the last
           point selected.
           Erase source objects? [Yes/No] <N>: prompt, press m to accept the Mirror command’s. Default Erase source
           objects option (No) and exit the Mirror command.

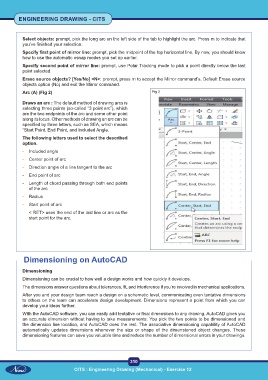
           Arc (A) (Fig 2)                                           Fig 2

           Draws an arc : The default method of drawing arcs is
           selecting three points (so-called “3 point arc”), which
           are the two endpoints of the arc and some other point
           along its locus. Other methods of drawing an arc can be
           specified by three letters, such as SEA, which means
           “Start Point, End Point, and Included Angle.
           The following letters used to select the described
           option.
           -  Included angle
           -   Center point of arc
           -   Direction angle of a line tangent to the arc

           -   End point of arc
           -   Length of chord passing through both end points
              of the arc

           -   Radius
           -   Start point of arc
              < RET> uses the end of the last line or arc as the
              start point for the arc.


            Dimensioning on AutoCAD


           Dimensioning
           Dimensioning can be crucial to how well a design works and how quickly it develops.
           The dimensions answer questions about tolerances, fit, and interference if you’re involved in mechanical applications.

           After you and your design team reach a design on a schematic level, communicating even tentative dimensions
           to others on the team can accelerate design development. Dimensions represent a point from which you can
           develop your ideas further.
           With the AutoCAD software, you can easily add tentative or final dimensions to any drawing. AutoCAD gives you
           an accurate dimension without having to take measurements. You pick the two points to be dimensioned and
           the dimension line location, and AutoCAD does the rest. The associative dimensioning capability of AutoCAD
           automatically  updates  dimensions  whenever  the  size  or  shape  of  the  dimensioned  object  changes. These
           dimensioning features can save you valuable time and reduce the number of dimensional errors in your drawings.


                                                           310
                                  CITS : Engineering Drawing (Mechanical) - Exercise 12

