Page 104 - CITS - ED - Mechanical
P. 104
ENGINEERING DRAWING - CITS


              Fig 3


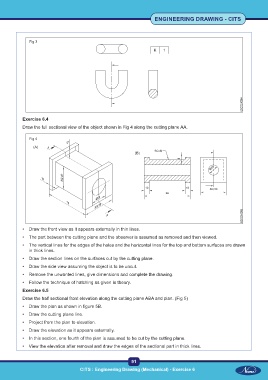
           Exercise 6.4
           Draw the full sectional view of the object shown in Fig 4 along the cutting plane AA.


              Fig 4


           •  Draw the front view as it appears externally in thin lines.
           •  The part between the cutting plane and the observer is assumed as removed and then viewed.
           •  The vertical lines for the edges of the holes and the horizontal lines for the top and bottom surfaces are drawn
              in thick lines.

           •  Draw the section lines on the surfaces cut by the cutting plane.
           •  Draw the side view assuming the object is to be uncut.
           •  Remove the unwanted lines, give dimensions and complete the drawing.
           •  Follow the technique of hatching as given in theory.

           Exercise 6.5
           Draw the half sectional front elevation along the cutting plane ABA and plan. (Fig 5)
           •  Draw the plan as shown in figure 5B.
           •  Draw the cutting plane line.
           •  Project from the plan to elevation.

           •  Draw the elevation as it appears externally.
           •  In this section, one fourth of the plan is assumed to be cut by the cutting plane.
           •  View the elevation after removal and draw the edges of the sectional part in thick lines.


                                                           91
                                     CITS : Engineering Drawing (Mechanical) - Exercise 6

