Page 105 - CITS - ED - Mechanical
P. 105
ENGINEERING DRAWING - CITS


              Fig 5


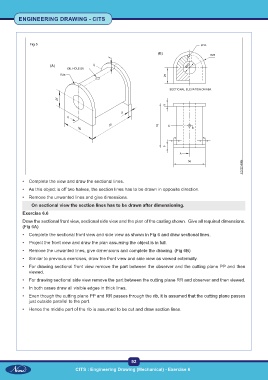
           •  Complete the view and draw the sectional lines.

           •  As this object is off two halves, the section lines has to be drawn in opposite direction.
           •  Remove the unwanted lines and give dimensions.
               On sectional view the section lines has to be drawn after dimensioning.
           Exercise 6.6
           Draw the sectional front view, sectional side view and the plan of the casting shown.  Give all required dimensions.
           (Fig 6A)
           •  Complete the sectional front view and side view as shown in Fig 6 and draw sectional lines.
           •  Project the front view and draw the plan assuming the object is in full.
           •  Remove the unwanted lines, give dimensions and complete the drawing. (Fig 6B)

           •  Similar to previous exercises, draw the front view and side view as viewed externally.
           •  For drawing sectional front view remove the part between the observer and the cutting plane PP and then
              viewed.

           •  For drawing sectional side view remove the part between the cutting plane RR and observer and then viewed.
           •  In both cases draw all visible edges in thick lines.
           •  Even though the cutting plane PP and RR passes through the rib, it is assumed that the cutting plane passes
              just outside parallel to the part.

           •  Hence the middle part of the rib is assumed to be cut and draw section lines.


                                                           92
                                   CITS : Engineering Drawing (Mechanical) - Exercise 6

