Page 109 - CITS - ED - Mechanical
P. 109
ENGINEERING DRAWING - CITS


               Fig 13


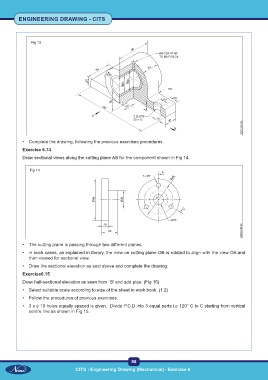
           •  Complete the drawing, following the previous exercises procedures.
           Exercise 6.14

           Draw sectional views along the cutting plane AB for the component shown in Fig 14.

              Fig 14


           •  The cutting plane is passing through two different planes.
           •  in such cases, as explained in theory, the view on cutting plane OB is rotated to align with the view OA and
              then viewed for sectional view.

           •  Draw the sectional elevation as said above and complete the drawing.
           Exercise6.15
           Draw half-sectional elevation as seen from `B' and add plan. (Fig 15)
           •  Select suitable scale according to size of the sheet in work book. (1:2)

           •  Follow the procedures of previous exercises.
           •  3 x φ 10 holes equally spaced is given.  Divide P.C.D into 3 equal parts i.e 120° C to C starting from vertical
              centre line as shown in Fig 15.


                                                           96
                                   CITS : Engineering Drawing (Mechanical) - Exercise 6

