Page 114 - CITS - ED - Mechanical
P. 114
ENGINEERING DRAWING - CITS


                Fig 9                                      Fig 10


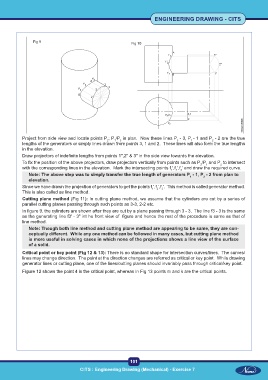
           Project from side view and locate points P ; P /P  in plan.  Now these lines P  - 3, P - 1 and P  - 2 are the true
                                                                                      1
                                                      3
                                                 2
                                                                                               2
                                                    1
                                                                                3
           lengths of the generators or simply lines drawn from points 3, 1 and 2.  These lines will also form the true lengths
           in the elevation.
           Draw projectors of indefinite lengths from points 1",2" & 3" in the side view towards the elevation.
           To fix the position of the above projectors, draw projectors vertically from points such as P /P  and P  to intersect
                                                                                             1
                                                                                          3
                                                                                                   2
           with the corresponding lines in the elevation.  Mark the intersecting points f ',f ',f ' and draw the required curve.
                                                                               2
                                                                             1
                                                                                 3
              Note: The above step was to simply transfer the true length of generators P  - 1, P  - 2 from plan to
                                                                                     1
                                                                                           2
              elevation.
           Since we have drawn the projection of generators to get the points f ',f ',f '.  This method is called generator method.
                                                                     1
                                                                       2
                                                                         3
           This is also called as line method.
           Cutting plane method (Fig 11): In cutting plane method, we assume that the cylinders are cut by a series of
           parallel cutting planes passing through such points as 3-3, 2-2 etc.
           In figure 9, the cylinders are shown after they are cut by a plane passing through 3 - 3.  The line f3 - 3 is the same
           as the generating line f3' - 3" int he front view of  figure and hence the rest of the procedure is same as that of
           line method.
              Note: Though both line method and cutting plane method are appearing to be same, they are con-
              ceptually different.  While any one method can be followed in many cases, but cutting plane method
              is more useful in solving cases in which none of the projections shows a line view of the surface
              of a solid.
           Critical point or key point (Fig 12 & 13): There is no standard shape for intersection curves/lines.  The curves/
           lines may change direction.  The point at the direction changes are referred as critical or key point.  While drawing
           generator lines or cutting plane, one of the lines/cutting planes should invariably pass through critical/key point.
           Figure 12 shows the point 4 is the critical point, whereas in Fig 13 points m and k are the critical points.


                                                           101
                                     CITS : Engineering Drawing (Mechanical) - Exercise 7

