Page 118 - CITS - ED - Mechanical
P. 118
ENGINEERING DRAWING - CITS


           •  Assume there is no slope surface and draw the development of cube of side 60 mm as given in Ex.No.14.1..
           •  Draw lines PQ and RS in the surfaces 1 and 3 in the basic development equivalent the shape shown in the
              isometric view of the box.
           •  Similarly join a rectangle of size equal to the surface 7 shown in isometric view with line RS or PQ and complete
              the development after erasing the construction lines.

           Exercise 7.5
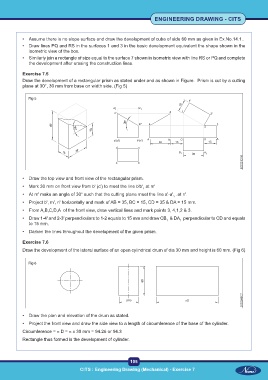
           Draw the development of a rectangular prism as stated under and as shown in Figure.  Prism is cut by a cutting
           plane at 30°, 30 mm from base on width side. (Fig 5)

              Fig 5


           •  Draw the top view and front view of the rectangular prism.

           •  Mark 30 mm on front view from b' (c') to meet the line b'b'  at m'
                                                                 1
           •  At m' make an angle of 30° such that the cutting plane meet the line a'-a'   at n'.
                                                                              1 '
           •  Project b', m', n' horizontally and mark of AB = 35, BC = 15, CD = 35 & DA = 15 mm.
           •  From A,B,C,D,A  of the front view, draw vertical lines and mark points 3, 4,1,2 & 3.

           •  Draw 1-4' and 2-3' perpendiculars to 1-2 equals to 15 mm and draw CB   & DA   perpendicular to CD and equals
                                                                                 1
                                                                           1
              to 15 mm.
           •  Darken the lines throughout the development of the given prism.
           Exercise 7.6
           Draw the development of the lateral surface of an open cylindrical drum of dia 30 mm and height is 60 mm. (Fig 6)


              Fig 6


           •  Draw the plan and elevation of the drum as stated.

           •  Project the front view and draw the side view to a length of circumference of the base of the cylinder.
           Circumference = π D = π x 30 mm = 94.26 or 94.3
           Rectangle thus formed is the development of cylinder.


                                                           105
                                     CITS : Engineering Drawing (Mechanical) - Exercise 7

