Page 124 - CITS - ED - Mechanical
P. 124
ENGINEERING DRAWING - CITS


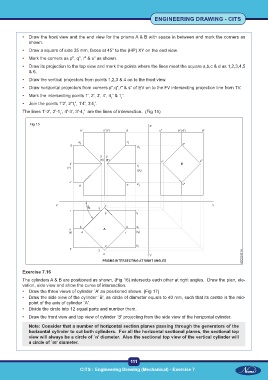
           •  Draw the front view and the end view for the prisms A & B with space in between and mark the corners as
              shown.
           •  Draw a square of side 35 mm, faces at 45° to the (HP) XY on the end view.
           •  Mark the corners as p", q", r" & s" as shown.

           •  Draw its projection to the top view and mark the points where the lines meet the square a,b,c & d as 1,2,3,4,5
              & 6.
           •  Draw the vertical projectors from points 1,2,3 & 4 on to the front view.
           •  Draw horizontal projectors from corners p",q",r" & s" of EV on to the FV intersecting projection line from TV.

           •  Mark the intersecting points 1', 2', 3', 4', 4 ' & 1 '.
                                                       1
                                                  1
           •  Join the points 1'2', 2'1 ', 1'4', 3'4 '.
                                  1
                                           1
           The lines 1'-2', 2'-1 ', 4'-3', 3'-4 '  are the lines of intersection.  (Fig 15)
                            1         1
              Fig 15


           Exercise 7.16

           The cylinders A & B are positioned as shown, (Fig 16) intersects each other at right angles.  Draw the plan, ele-
           vation, side view and show the curve of intersection.
           •  Draw the three views of cylinder `A' as positioned shown. (Fig 17)
           •  Draw the side view of the cylinder `B', as circle of diameter equals to 40 mm, such that its centre is the mid-
              point of the axis of cylinder `A'.
           •  Divide the circle into 12 equal parts and number them.
           •  Draw the front view and top view of cylinder `B' projecting from the side view of the horizontal cylinder.
              Note: Consider that a number of horizontal section planes passing through the generators of the
              horizontal cylinder to cut both cylinders.  For all the horizontal sectional planes, the sectional top
              view will always be a circle of `n' diameter.  Also the sectional top view of the vertical cylinder will
              a circle of `m' diameter.


                                                           111
                                     CITS : Engineering Drawing (Mechanical) - Exercise 7

