Page 126 - CITS - ED - Mechanical
P. 126
ENGINEERING DRAWING - CITS


           Exercise 7.17

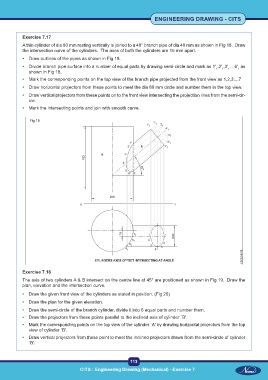
           A thin cylinder of dia 80 mm resting vertically is joined to a 40° branch pipe of dia 40 mm as shown in Fig 18.  Draw
           the intersection curve of the cylinders.  The axes of both the cylinders are 15 mm apart.
           •  Draw outlines of the pipes as shown in Fig 18.

           •  Divide branch pipe surface into a number of equal parts by drawing semi-circle and mark as 1' ,2' ,3' ....6'  as
                                                                                                 1
                                                                                                    1
                                                                                                      1
                                                                                                           1
              shown in Fig 18.
           •  Mark the corresponding points on the top view of the branch pipe projected from the front view as 1,2,3....7
           •  Draw horizontal projectors from these points to meet the dia 80 mm circle and number them in the top view.
           •  Draw vertical projectors from these points on to the front view intersecting the projection lines from the semi-cir-
              cle.
           •  Mark the intersecting points and join with smooth curve.


              Fig 18


           Exercise 7.18

           The axis of two cylinders A & B intersect on the centre line at 45° are positioned as shown in Fig 19.  Draw the
           plan, elevation and the intersection curve.
           •  Draw the given front view of the cylinders as stated in position. (Fig 20)

           •  Draw the plan for the given elevation.
           •  Draw the semi-circle of the branch cylinder, divide it into 6 equal parts and number them.
           •  Draw the projectors from these points parallel to the inclined axis of cylinder `B'.
           •  Mark the corresponding points on the top view of the cylinder `A' by drawing horizontal projectors from the top
              view of cylinder `B'.
           •  Draw vertical projectors from these point to meet the inclined projectors drawn from the semi-circle of cylinder
              `B'.


                                                           113
                                     CITS : Engineering Drawing (Mechanical) - Exercise 7

