Page 125 - CITS - ED - Mechanical
P. 125
ENGINEERING DRAWING - CITS


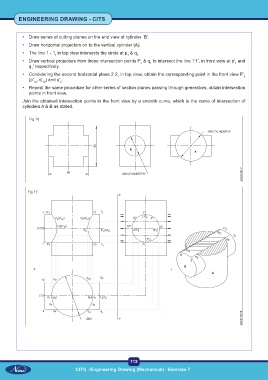
           •  Draw series of cutting planes on the end view of cylinder `B'.

           •  Draw horizontal projectors on to the vertical cylinder (A).
           •  The line 1 - 1  in top view intersects the circle at p  & q .
                                                              1
                         1
                                                          1
           •  Draw vertical projectors from these intersection points P  & q  to intersect the line 1'1', in front view at p'  and
                                                                    1
                                                                                                         1
                                                               1
              q ' respectively.
               1
           •  Considering the second horizontal plane 2 2  in top view, obtain the corresponding point in the front view P'
                                                     1
                                                                                                             2
              (p' , q' ) and q' .
                            2
                    12
                12
           •  Repeat the same procedure for other series of section planes passing through generators, obtain intersection
              points in front view.
           Join the obtained intersection points in the front view by a smooth curve, which is the curve of intersection of
           cylinders A & B as stated.
              Fig 16


             Fig 17


                                                           112
                                   CITS : Engineering Drawing (Mechanical) - Exercise 7

