Page 159 - CITS - ED - Mechanical
P. 159
ENGINEERING DRAWING - CITS


           •  Draw a centre line.

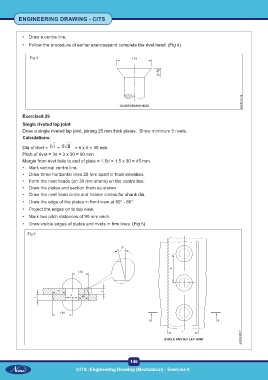
           •  Follow the procedure of earlier exercisesand complete the rivet head. (Fig 4)

              Fig 4


           Exercise8.29

           Single riveted lap joint
           Draw a single riveted lap joint, joining 25 mm thick plates.  Show minimum 3 rivets.
           Calculations:

           Dia of rivet =    =     = 6 x 5 = 30 mm
           Pitch of rivet = 3d = 3 x 30 = 90 mm
           Margin from rivet hole to end of plate = 1.5d = 1.5 x 30 = 45 mm.
           •  Mark vertical centre line.
           •  Draw three horizontal lines 25 mm apart in front elevation.
           •  Form the rivet heads (on 30 mm shank) on the centre line.
           •  Draw the plates and section them as shown
           •  Draw the rivet head circle and hidden circles for shank dia.
           •  Draw the edge of the plates in front view at 80° - 85°.
           •  Project the edges on to top view.
           •  Mark two pitch distances of 90 mm each.
           •  Draw visible edges of plates and rivets in firm lines. (Fig 5)

             Fig 5


                                                           146
                                   CITS :Engineering Drawing (Mechanical) - Exercise 8

