Page 17 - CITS - ED - Mechanical
P. 17
ENGINEERING DRAWING - CITS


               Fig 3


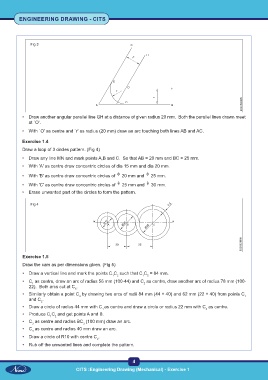
           •  Draw another angular parallel line GH at a distance of given radius 20 mm.  Both the parallel lines drawn meet
              at `O'.
           •  With `O' as centre and `r' as radius (20 mm) draw an arc touching both lines AB and AC.

           Exercise 1.4
           Draw a loop of 3 circles pattern. (Fig 4)

           •  Draw any line MN and mark points A,B and C.  So that AB = 20 mm and BC = 25 mm.
           •  With 'A' as centre draw concentric circles of dia 15 mm and dia 20 mm.

           •  With 'B' as centre draw concentric circles of   20 mm and   25 mm.
           •  With 'C' as centre draw concentric circles of   25 mm and   30 mm.
           •  Erase unwanted part of the circles to form the pattern.


               Fig 4


           Exercise 1.5
           Draw the cam as per dimensions given. (Fig 5)

           •  Draw a vertical line and mark the points C C  such that C C  = 84 mm.
                                                   1
                                                     2
                                                                  2
                                                                1
           •  C  as centre, draw an arc of radius 56 mm (100-44) and C  as centre, draw another arc of radius 78 mm (100-
               1
                                                                 2
              22).  Both arcs cut at C .
                                  3
           •  Similarly obtain a point C  by drawing two arcs of radii 84 mm (44 + 40) and 62 mm (22 + 40) from points C
                                                                                                              1
                                    4
              and C .
                   2
           •  Draw a circle of radius 44 mm with C as centre and draw a circle or radius 22 mm with C  as centre.
                                                                                            2
                                              1
           •  Produce C C  and get points A and B.
                       1
                         2
           •  C  as centre and radius BC  (100 mm) draw an arc.
               3                      3
           •  C  as centre and radius 40 mm draw an arc.
               4
           •  Draw a circle of R10 with centre C .
                                            2
           •  Rub off the unwanted lines and complete the pattern.
                                                            4
                                   CITS :Engineering Drawing (Mechanical) - Exercise 1

