Page 109 - CITS - Fitter - Trade Theory
P. 109
FITTER - CITS


           Radius and fillet gauges
           Components are machined to have curved formation on the edges or at the junction of two steps. Accordingly,
           they are called radius and fillets. The size of the radius and radius is normally provided on a drawing. The gauges
           used to check the radius formed on the edges of diameters are fillet and
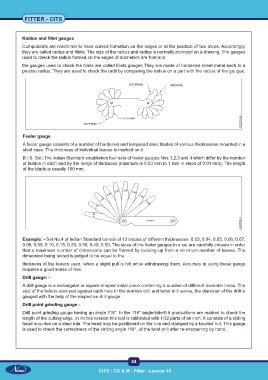
           the gauges used to check the fillets are called fillets gauges They are made of hardened sheet metal each to a
           precise radius. They are used to check the radii by comparing the radius on a part with the radius of the gauges.


           Feeler gauge
           A feeler gauge consists of a number of hardened and tempered steel blades of various thicknesses mounted in a
           steel case. The thickness of individual leaves is marked on it.
           B.I.S. Set: The Indian Standard establishes four sets of feeler gauges Nos.1,2,3 and 4 which differ by the number
           of blades in each and by the range of thickness (minimum is 0.03 mm to 1 mm in steps of 0.01 mm). The length
           of the blade is usually 100 mm.


           Example: - Set No.4 of Indian Standard consist of 13 blades of different thicknesses. 0.03, 0.04, 0.05, 0.06, 0.07,
           0.08, 0.09, 0.10, 0.15, 0.20, 0.30, 0.40, 0.50. The sizes of the feeler gauges in a set are carefully chosen in order
           that a maximum number of dimensions can be formed by building up from a minimum number of leaves. The
           dimension being tested is judged to be equal to the
           thickness of the leaves used, when a slight pull is felt while withdrawing them. Accuracy in using these gauge
           requires a good sense of feel.
           Drill gauge: -
           A drill gauge is a rectangular or square shaped metal piece containing a number of different diameter holes. The
           size of the hole is stamped against each hole In the number drill and letter drill series, the diameter of the drill is
           gauged with the help of the respective drill gauge
           Drill point grinding gauge:-

           Drill point grinding gauge having an angle 118°. In the 118° angle/side/0.5 graduations are marked to check the
           length of the cutting edge. In inches version this tool is calibrated with 1/32 parts of an inch. It consists of a sliding
           head mounted on a steel rule. The head may be positioned on the rule and clamped by a knurled nut. This gauge
           is used to check the correctness of the cutting angle 118°, of the twist drill after re-sharpening by hand.


                                                           94

                                             CITS : CG & M - Fitter - Lesson 15

