Page 98 - CITS - ED - Mechanical
P. 98
ENGINEERING DRAWING - CITS


            Sectional views


           Hatching
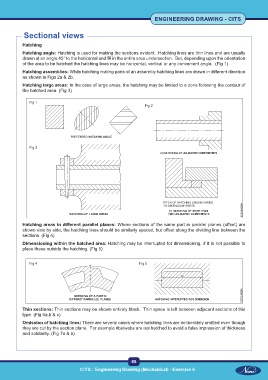
           Hatching angle: Hatching is used for making the sections evident.  Hatching lines are thin lines and are usually
           drawn at an angle 45° to the horizontal and fill in the entire area undersection.  But, depending upon the orientation
           of the area to be hatched the hatching lines may be horizontal, vertical or any convenient angle.  (Fig 1)
           Hatching assemblies: While hatching mating parts of an assembly hatching lines are drawn in different direction
           as shown in Figs 2a & 2b.

           Hatching large areas: In the case of large areas, the hatching may be limited to a zone following the contour of
           the hatched area. (Fig 3)


              Fig 1
                                                                 Fig 2


              Fig 3


           Hatching areas in different parallel planes: Where sections of the same part in parallel planes (offset) are
           shown side by side, the hatching lines should be similarly spaced, but offset along the dividing line between the
           sections. (Fig 4)
           Dimensioning within the hatched area: Hatching may be interrupted for dimensioning, if it is not possible to
           place these outside the hatching. (Fig 5)


              Fig 4                                            Fig 5


           Thin sections: Thin sections may be shown entirely black.  Thin space is left between adjacent sections of this
           type. (Fig 6a,b & c)
           Omission of hatching lines: There are several cases where hatching lines are deliberately omitted even though
           they are cut by the section plane.  For example ribs/webs are not hatched to avoid a false impression of thickness
           and solidarity. (Fig 7a & b)


                                                           85
                                     CITS : Engineering Drawing (Mechanical) - Exercise 6

