Page 95 - CITS - ED - Mechanical
P. 95
ENGINEERING DRAWING - CITS


           Hatching means filling the surface with equi-distant parallel  lines.
           It may be recalled that the object whose internal details are to be drawn are assumed as cut by an imaginary cut-
           ting plane passing through them.  The part between the cutting plane and the observer is assumed as removed
           and the surfaces cut are shown by the inclined parallel lines called section lines. The cutting planes are normally
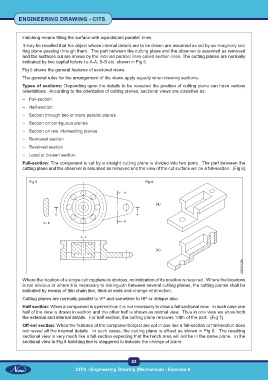
           indicated by two capital letters i.e A-A, B-B etc. shown in Fig 5.
           Fig 5 shows the general features of sectional views.

           The general rules for the arrangement of the views apply equally when drawing sections.
           Types of sections: Depending upon the details to be revealed the position of cutting plane can have various
           orientations.  According to the orientation of cutting planes, sectional views are classified as:

           –  Full-section
           –  Half-section
           –  Section through two or more parallel planes
           –  Section on contiguous planes
           –  Section on two intersecting planes

           –  Removed section
           –  Revolved section
           –  Local or broken section.
           Full-section: The component is cut by a straight cutting plane is divided into two parts.  The part between the
           cutting plane and the observer is assumed as removed and the view of the cut surface will be a full-section.  (Fig 6)


              Fig 5                                               Fig 6


           Where the location of a single cutting plane is obvious, no indication of its position is required.  Where the locations
           is not obvious or where it is necessary to distinguish between several cutting planes, the cutting planes shall be
           indicated by means of thin chain line, thick at ends and change of direction.
           Cutting planes are normally parallel to VP and sometime to HP or oblique also.
           Half section: When a component is symmetrical it is not necessary to draw a full sectional view.  In such case one
           half of the view is drawn in section and the other half is shown as normal view.  Thus in one view we show both
           the external and internal details.  For half section, the cutting plane removes 1/4th of the part.  (Fig 7)
           Off-set section: When the features of the component/object are not in one line a full-section or half-section does
           not reveal all the internal details.  In such cases, the cutting plane is off-set as shown in Fig 8.  The resulting
           sectional view is very much like a full-section expecting that the hatch area will not be in the same plane.  In the
           sectional view in Fig 8 hatching line is staggered to indicate the change of plane.


                                                           82
                                   CITS : Engineering Drawing (Mechanical) - Exercise 6

