Page 94 - CITS - ED - Mechanical
P. 94
ENGINEERING DRAWING - CITS


           EXERCISE 6 : Sectional views


            Sectional views

           In the normal Orthographic views (plan, elevation and side  view), the internal details, their features and relative
           positions which cannot be seen are shown by dotted lines.
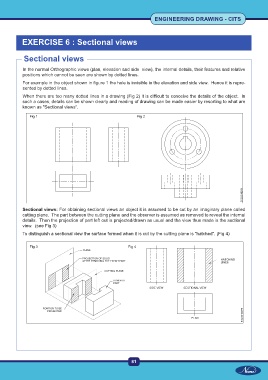
           For example in the object shown in figure 1 the hole is invisible in the elevation and side view.  Hence it is repre-
           sented by dotted lines.
           When there are too many dotted lines in a drawing (Fig 2) it is difficult to conceive the details of the object.  In
           such a cases, details can be shown clearly and reading of drawing can be made easier by resorting to what are
           known as "Sectional views".

              Fig 1                                           Fig 2


           Sectional views: For obtaining sectional views an object it is assumed to be cut by an imaginary plane called
           cutting plane.  The part between the cutting plane and the observer is assumed as removed to reveal the internal
           details.  Then the projection of part left out is projected/drawn as usual and the view thus made is the sectional
           view.  (see Fig 3)
           To distinguish a sectional view the surface formed when it is cut by the cutting plane is "hatched". (Fig 4)


              Fig 3                                       Fig 4


                                                           81

