Page 96 - CITS - ED - Mechanical
P. 96
ENGINEERING DRAWING - CITS


               Fig 7                                         Fig 8


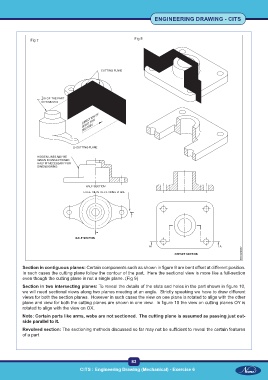
           Section in contiguous planes: Certain components such as shown in figure 9 are bent offset at different position.
           In such cases the cutting plane follow the contour of the part.  Here the sectional view is more like a full-section
           even though the cutting plane is not a single plane. (Fig 9)
           Section in two intersecting planes: To reveal the details of the slots and holes in the part shown in figure 10,
           we will need sectional views along two planes meeting at an angle.  Strictly speaking we have to draw different
           views for both the section planes.  However in such cases the view on one plane is rotated to align with the other
           plane and view for both the cutting planes are shown in one view.  In figure 10 the view on cutting planes OY is
           rotated to align with the view on OX.

           Note: Certain parts like arms, webs are not sectioned.  The cutting plane is assumed as passing just out-
           side parallel to it.
           Revolved section: The sectioning methods discussed so far may not be sufficient to reveal the certain features
           of a part.


                                                           83
                                     CITS : Engineering Drawing (Mechanical) - Exercise 6

