Page 133 - CITS - Fitter Trade Practical - Volume -2
P. 133
FITTER - CITS


           •   These machines are best suited for the test and inspection of equipment, gauges and tools.

           •   For aircraft and space vehicles, hundred percent inspections is carried out by using CMM.
           •  These are ideal for determination of shape and position, maximum material condition, linkage of results etc.
              which cannot do in conventional machines.

           -  CMMs are also best for ensuring economic viability of NC machines by reducing their downtime for inspection
              results. They also help in reducing cost, rework cost at the appropriate time with a suitable CMM.
           Advantages

           •  The inspection  rate is  increased.
           •  Accuracy is more.
           •  Operators error can be minimized.
           •  Skill requirements of the operator is reduced.
           •  Reduced inspection fixturing and maintenance cost.
           •  Reduction in calculating and recording time.

           •  Reduction in set up time.
           •  No need of separate measuring instruments and gauges for each feature / GD &T.
           •  Reduction of scrap and good part rejection.
           •  Simplification of inspection procedures, possibility of reduction of total inspection time through use of statistical
              anddata analysis techniques.
           Disadvantages
           The cost of machine is high. The Maintenance cost of machine is high The machine is not portable like other
           instruments The cost of infrastructure like, Lab,Temperature controtted  Environment( Dust Free}
           Operator must have the knowledge to operate the machine
           Coordinate Measuring Machine (CMM) use
           It is mainly used for three-dimensional measurement of dies such as automobile parts and various mechanical
           parts, three-dimensional objects such as prototypes, and measurement of differences from drawings.
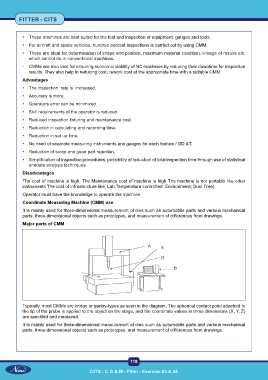
           Major parts of CMM


           Typically, most CMMs are bridge or gantry-types as seen in the diagram. The spherical contact point attached to
           the tip of the probe is applied to the object on the stage, and the coordinate values in three dimensions (X, Y, Z)
           are specified and measured.
           It is mainly used for three-dimensional measurement of dies such as automobile parts and various mechanical
           parts, three-dimensional objects such as prototypes, and measurement of differences from drawings.


                                                           118

                                         CITS : C G & M - Fitter - Exercise 83 & 84

