Page 131 - CITS - Welder - Trade Practical
P. 131
WELDER - CITS


             Fig 1                                          Fig 2


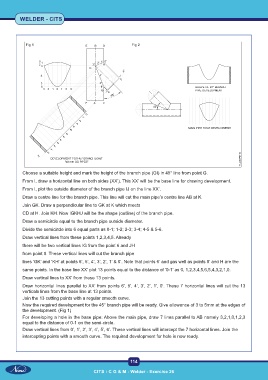
           Choose a suitable height and mark the height of the branch pipe (GI) in 45° line from point G.
           From I, draw a horizontal line on both sides (XX’). This XX’ will be the base line for drawing development.

           From I, plot the outside diameter of the branch pipe IJ on the line XX’.
           Draw a centre line for the branch pipe. This line will cut the main pipe’s centre line AB at K.
           Join GK. Draw a perpendicular line to GK at K which meets
           CD at H. Join KH. Now IGKHJ will be the shape (outline) of the branch pipe.
           Draw a semicircle equal to the branch pipe outside diameter.

           Divide the semicircle into 6 equal parts as 0-1; 1-2; 2-3; 3-4; 4-5 & 5-6.
           Draw vertical lines from these points 1,2,3,4,5. Already
           there will be two vertical lines IG from the point 6 and JH
           from point 0. These vertical lines will cut the branch pipe

           lines ‘GK’ and ‘KH’ at points 6’, 5’, 4’, 3’, 2’, 1’ & 0’. Note that points 6’ and gas well as points 0’ and H are the
           same points. In the base line XX’ plot 13 points equal to the distance of ‘0-1’ as 0, 1,2,3,4,5,6,5,4,3,2,1,0.
           Draw vertical lines to XX’ from these 13 points.
           Draw horizontal lines parallel to XX’ from points 6’, 5’, 4’, 3’, 2’, 1’, 0’. These 7 horizontal lines will cut the 13
           verticals lines from the base line at 13 points.
           Join the 13 cutting points with a regular smooth curve.
           Now the required development for the 45° branch pipe will be ready. Give allowance of 3 to 5mm at the edges of
           the development. (Fig 1)
           For developing a hole in the base pipe: Above the main pipe, draw 7 lines parallel to AB namely 3,2,1,0,1,2,3
           equal to the distance of 0-1 on the semi-circle.
           Draw vertical lines from 0’, 1’, 2’, 3’, 4’, 5’, 6’. These vertical lines will intercept the 7 horizontal lines. Join the
           intercepting points with a smooth curve. The required development for hole is now ready.


                                                           114

                                           CITS : C G & M - Welder - Exercise 26

