Page 222 - CITS - ED - Mechanical
P. 222
ENGINEERING DRAWING - CITS


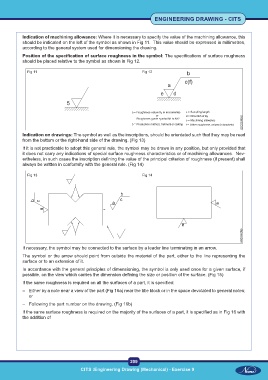
           Indication of machining allowance: Where it is necessary to specify the value of the machining allowance, this
           should be indicated on the left of the symbol as shown in Fig 11.  This value should be expressed in millimetres,
           according to the general system used for dimensioning the drawing.
           Position of the specification of surface roughness in the symbol: The specifications of surface roughness
           should be placed relative to the symbol as shown in Fig 12.

             Fig 11                                             Fig 12


           Indication on drawings: The symbol as well as the inscriptions, should be orientated such that they may be read
           from the bottom or the right-hand side of the drawing. (Fig 13)
           If it is not practicable to adopt this general rule, the symbol may be drawn in any position, but only provided that
           it does not carry any indications of special surface roughness characteristics or of machining allowances.  Nev-
           ertheless, in such cases the inscription defining the value of the principal criterion of roughness (if present) shall
           always be written in conformity with the general rule. (Fig 14)

             Fig 13                                             Fig 14


           If necessary, the symbol may be connected to the surface by a leader line terminating in an arrow.
           The symbol or the arrow should point from outside the material of the part, either to the line representing the
           surface or to an extension of it.
           In accordance with the general principles of dimensioning, the symbol is only used once for a given surface, if
           possible, on the view which carries the dimension defining the size or position of the surface. (Fig 15)
           If the same roughness is required on all the surfaces of a part, it is specified:

           –  Either by a note near a view of the part (Fig 16a) near the title block or in the space devotated to general notes;
              or
           –  Following the part number on the drawing. (Fig 16b)

           If the same surface roughness is required on the majority of the surfaces of a part, it is specified as in Fig 16 with
           the addition of


                                                           209
 CITS :Engineering Drawing (Mechanical) - Exercise 9  CITS :Engineering Drawing (Mechanical) - Exercise 9

