Page 218 - CITS - ED - Mechanical
P. 218
ENGINEERING DRAWING - CITS


            Method of indicating surface roughness
            for general engineering drawing


           Scope: This section of the code specifies the symbols and additional indications of surface roughness.

           Symbols used for indication of surface roughness
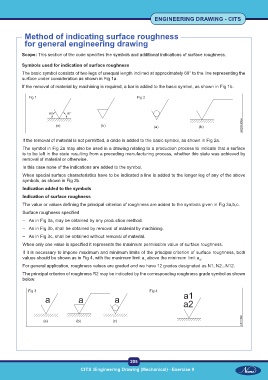
           The basic symbol consists of two legs of unequal length inclined at approximately 60° to the line representing the
           surface under consideration as shown in Fig 1a.
           If the removal of material by machining is required, a bar is added to the basic symbol, as shown in Fig 1b.

              Fig 1                                           Fig 2


           If the removal of material is not permitted, a circle is added to the basic symbol, as shown in Fig 2a.
           The symbol in Fig 2a may also be used in a drawing relating to a production process to indicate that a surface
           is to be left in the state resulting from a preceding manufacturing process, whether this state was achieved by
           removal of material or otherwise.
           In this case none of the indications are added to the symbol.

           When special surface characteristics have to be indicated a line is added to the longer leg of any of the above
           symbols, as shown in Fig 2b.
           Indication added to the symbols

           Indication of surface roughness
           The value or values defining the principal criterion of roughness are added to the symbols given in Fig 3a,b,c.
           Surface roughness specified
           –  As in Fig 3a, may be obtained by any production method.
           –  As in Fig 3b, shall be obtained by removal of material by machining.

           –  As in Fig 3c, shall be obtained without removal of material.
           When only one value is specified it represents the maximum permissible value of surface roughness.
           If it is necessary to impose maximum and minimum limits of the principal criterion of surface roughness, both
           values should be shown as in Fig 4, with the maximum limit a  above the minimum limit a .
                                                                 1                        2
           For general application, roughness values are graded and we have 12 grades designated as N1, N2...N12.
           The principal criterion of roughness R2 may be indicated by the corresponding roughness grade symbol as shown
           below:


              Fig 3                                                Fig 4


                                                           205
 CITS :Engineering Drawing (Mechanical) - Exercise 9  CITS :Engineering Drawing (Mechanical) - Exercise 9

