Page 216 - CITS - ED - Mechanical
P. 216
ENGINEERING DRAWING - CITS


              Fig 3                                              Fig 4


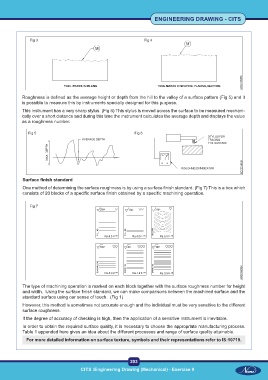
           Roughness is defined as the average height or depth from the hill to the valley of a surface pattern (Fig 5) and it
           is possible to measure this by instruments specially designed for this purpose.
           This instrument has a very sharp stylus. (Fig 6) This stylus is moved across the surface to be measured mechani-
           cally over a short distance and during this time the instrument calculates the average depth and displays the value
           as a roughness number.

              Fig 5                                          Fig 6


           Surface finish standard
           One method of determining the surface roughness is by using a surface finish standard. (Fig 7) This is a box which
           consists of 20 blocks of a specific surface finish obtained by a specific machining operation.

              Fig 7


           The type of machining operation is marked on each block together with the surface roughness number for height
           and width.  Using the surface finish standard, we can make comparisons between the machined surface and the
           standard surface using our sense of touch.  (Fig 1)

           However, this method is sometimes not accurate enough and the individual must be very sensitive to the different
           surface roughness.
           If the degree of accuracy of checking is high, then the application of a sensitive instrument is inevitable.

           In order to obtain the required surface quality, it is necessary to choose the appropriate manufacturing process.
           Table 1 appended here gives an idea about the different processes and range of surface quality attainable.
             For more detailed information on surface texture, symbols and their representations refer to IS:10719.


                                                           203
 CITS :Engineering Drawing (Mechanical) - Exercise 9  CITS :Engineering Drawing (Mechanical) - Exercise 9

