Page 215 - CITS - ED - Mechanical
P. 215
ENGINEERING DRAWING - CITS


           Term                     Abbreviations/Symbol         Term                 Abbreviations/Symbol
           Pressure                        p                     Square                        SQ,
           Pattern number              PATT NO.                  Standard                      STD
           Quantity                      QTY                     Square centimetre             Cm 2
           Radius                          R                     Square metre                  m 2

           Reference                     REF                     Square millimetre             mm 2
           Required                     REQD                     Symmetrical                  SYM
           Revolution per minute          rpm                    Standard wire gauge          SWG
           Rockwell hardness `A' scale   HRA                     Tee (Structural section)       T
           Rockwell hardness `B' scale   HRB                     Threads per inch              TPI

           Rockwell hardness `C' scale   HRC                     Temperature                  TEMP
           Right hand                     RH                     Time                           t
           Round head                   RD.HD                    Tanne                          t

           Second of angle                 "                     Undercut                    U' CUT
                                                                 Volt                           V
           Serial number                SL.No.
                                                                 Volume                        VOL
           Second of time                  S
                                                                 Vickers hardness              HV
           Spot face                      SF
                                                                 Weight                         W
           Screwed                       SCR


            Surface quality


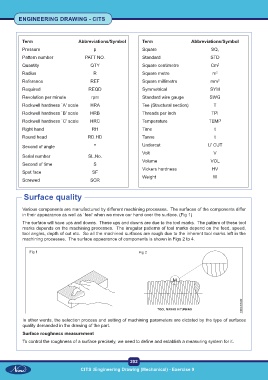
           Various components are manufactured by different machining processes.  The surfaces of the components differ
           in their appearance as well as `feel' when we move our hand over the surface. (Fig 1)
           The surface will have ups and downs.  These ups and downs are due to the tool marks.  The pattern of these tool
           marks depends on the machining processes.  The irregular patterns of tool marks depend on the feed, speed,
           tool angles, depth of cut etc.  So all the machined surfaces are rough due to the inherent tool marks left in the
           machining processes.  The surface appearance of components is shown in Figs 2 to 4.


              Fig 1                                            Fig 2


           In other words, the selection process and setting of machining parameters are dictated by the type of surfaces
           quality demanded in the drawing of the part.
           Surface roughness measurement

           To control the roughness of a surface precisely, we need to define and establish a measuring system for it.


                                                           202
                                     CITS :Engineering Drawing (Mechanical) - Exercise 9

