Page 26 - CITS - ED - Mechanical
P. 26
ENGINEERING DRAWING - CITS


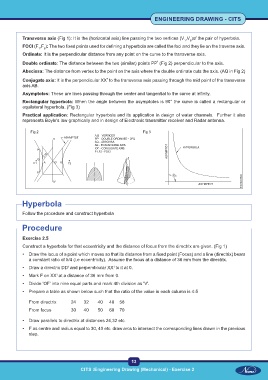
           Transverse axis (Fig 1): It is the (horizontal axis) line passing the two vertices (V ,V )of the pair of hyperbola.
                                                                                     2
                                                                                   1
           FOCI (F ,F ): The two fixed points used for defining a hyperbola are called the foci and they lie on the traverse axis.
                  1
                     2
           Ordinate: It is the perpendicular distance from any point on the curve to the transverse axis.
           Double ordinate: The distance between the two (similar) points PP' (Fig 2) perpendicular to the axis.
           Abscissa: The distance from vertex to the point on the axis where the double ordinate cuts the axis. (AQ in Fig 2)
           Conjugate axis: It is the perpendicular XX' to the transverse axis passing through the mid point of the transverse
           axis AB.
           Asymptotes: These are lines passing through the center and tangential to the curve at infinity.
           Rectangular hyperbola: When the angle between the asymptotes is 90° the curve is called a rectangular or
           equilateral hyperbola. (Fig 3)
           Practical application: Rectangular hyperbola and its application in design of water channels.  Further it also
           represents Boyle's law graphically and in design of Electronic transmitter receiver and Radar antenna.


               Fig 2                                            Fig 3


           Hyperbola

           Follow the procedure and construct hyperbola


           Procedure

           Exercise 2.5
           Construct a hyperbola for that eccentricity and the distance of focus from the directrix are given. (Fig 1)

           •  Draw the locus of a point which moves so that its distance from a fixed point (Focus) and a line (directrix) bears
              a constant ratio of 5/4 (i.e eccentricity).  Assume the focus at a distance of 36 mm from the directrix.
           •  Draw a directrix DD and perpendicular XX to it at 0.
                                                   1
                               1
           •  Mark F on XX at a distance of 36 mm from 0.
                          1
           •  Divide 'OF' into nine equal parts and mark 4th division as 'V'.
           •  Prepare a table as shown below such that the ratio of the value in each column is 4:5

              From directrix     24    32    40   48  56
              From focus         30   40    50    60  70

           •  Draw parallels to directrix at distances 24,32 etc.
           •  F as centre and radius equal to 30, 40 etc. draw arcs to intersect the corresponding lines drawn in the previous
              step.


                                                           13
                                     CITS :Engineering Drawing (Mechanical) - Exercise 2

