Page 248 - CITS - Fitter Trade Pactical - Volume - 2
P. 248
FITTER - CITS


           TASK 2 : Tool reference point and commanding point
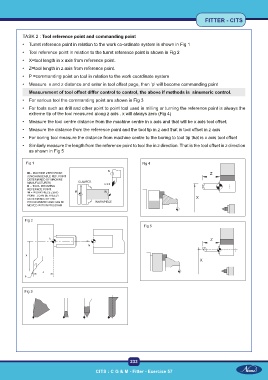
           •  Turret reference point in relation to the work co-ordinate system is shown in Fig 1

           •  Tool reference point in relation to the turret reference point is shown in Fig 2
           •  X=tool length in x axis from reference point.
           •  Z=tool length in z axis from reference point.
           •  P =commanding point on tool in relation to the work coordinate system
           •  Measure  x and z distance and enter in tool offset page, then ‘p’ will become commanding point

              Measurement of tool offset differ control to control, the above if methods is  sinumeric control.
           •  For various tool the commanding point are shown in Fig 3
           •  For tools such as drill and other point to point tool used in milling or turning the reference point is always the
              extreme tip of the tool measured along z axis . x will always zero (Fig 4)
           •  Measure the tool centre distance from the machine centre in x axis and that will be x axis tool offset.
           •  Measure the distance from the reference point and the tool tip in z and that is tool offset in z axis
           •  For boring tool measure the distance from machine centre to the boring to tool tip that is x axis tool offset
           •  Similarly measure the length from the reference point to tool the in z direction. That is the tool offset in z direction
              as shown in Fig 5

             Fig 1                                              Fig 4


            Fig 2
                                                                 Fig 5


            Fig 3


                                                           233

 CITS : C G & M - Fitter - Exercise 57      CITS : C G & M - Fitter - Exercise 57

