Page 259 - CITS - Welder - Trade Theory
P. 259
WELDER - CITS


           Hardness Test : Hardness is defined as the resistance of a material to permanent deformation such as indentation,
           wear, abrasion, scratch. Principally, the importance of hardness testing has to do with the relationship between
           hardness and other properties of material. For example, both the hardness test and the tensile test measure the
           resistance of a metal to plastic flow, and results of these tests may closely parallel each other. The hardness test
           is preferred because it is simple, easy, and relatively nondestructive. There are many hardness tests currently
           in use. The necessity for all these different hardness tests is due to the need for categorizing the great range of
           hardness from soft rubber to hard ceramics.
           THEORY

           Current practice divides hardness testing into two categories: macrohardness and microhardness. Macrohardness
           refers to testing with applied loads on the indenter of more than 1 kg and covers, for example, the testing of tools,
           dies, and sheet material in the heavier gages. In microhardness testing, applied loads are 1 kg and below, and
           material being tested is very thin (down to 0.0125 mm, or 0.0005 in.). Applications include extremely small parts,
           thin superficially hardened parts, plated surfaces, and individual constituents of materials.
           1  Macro Hardness Testers Loads > 1 kg • Rockwell • Brinell • Vickers
           2  Micro Hardness Testers < 1 kg • Knoop diamond • Vickers diamond pyramid

           3.1 Macro Hardness Test Methods
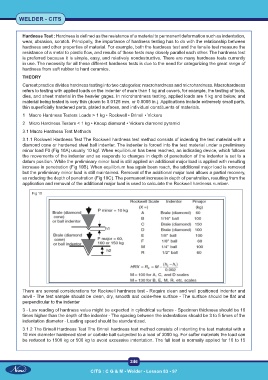
           3.1.1 Rockwell Hardness Test The Rockwell hardness test method consists of indenting the test material with a
           diamond cone or hardened steel ball indenter. The indenter is forced into the test material under a preliminary
           minor load F0 (Fig 10A) usually 10 kgf. When equilibrium has been reached, an indicating device, which follows
           the movements of the indenter and so responds to changes in depth of penetration of the indenter is set to a
           datum position. While the preliminary minor load is still applied an additional major load is applied with resulting
           increase in penetration (Fig 10B). When equilibrium has again been reach, the additional major load is removed
           but the preliminary minor load is still maintained. Removal of the additional major load allows a partial recovery,
           so reducing the depth of penetration (Fig 10C). The permanent increase in depth of penetration, resulting from the
           application and removal of the additional major load is used to calculate the Rockwell hardness number.

               Fig 10


           There are several considerations for Rockwell hardness test - Require clean and well positioned indenter and
           anvil - The test sample should be clean, dry, smooth and oxide-free surface - The surface should be flat and
           perpendicular to the indenter
           3 - Low reading of hardness value might be expected in cylindrical surfaces - Specimen thickness should be 10
           times higher than the depth of the indenter - The spacing between the indentations should be 3 to 5 times of the
           indentation diameter - Loading speed should be standardized.
           3.1.2 The Brinell Hardness Test The Brinell hardness test method consists of indenting the test material with a
           10 mm diameter hardened steel or carbide ball subjected to a load of 3000 kg. For softer materials the load can
           be reduced to 1500 kg or 500 kg to avoid excessive indentation. The full load is normally applied for 10 to 15


                                                           246

                                         CITS : C G & M - Welder - Lesson 83 - 97                                                                               CITS : C G & M - Welder - Lesson 83 - 97

