Page 261 - CITS - Welder - Trade Theory
P. 261
WELDER - CITS


           Radiographic  testing  (RT) - Principles  -  Advantages -

           Limitations - Basic Radiation Physics - X-Rays - Gama Rays

           - Radiographic Techniques - Radiographic Interpretation
           and Evaluation


           Objectives : At the end of this lesson you shall be able to
           •  describe the principal of RT
           •  explain the advantage and limitation
           •  explain the radiographic testing techniques.


           Radiographic test: This test is also called X-ray or gamma ray test.
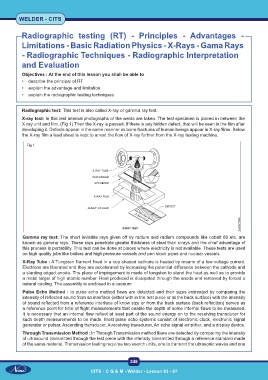
           X-ray test: In this test internal photographs of the welds are taken. The test specimen is placed in between the
           X-ray unit and film. (Fig 1) Then the X-ray is passed. If there is any hidden defect, that will be seen in the film after
           developing it. Defects appear in the same manner as bone fractures of human beings appear in X-ray films. Below
           the X-ray film a lead sheet is kept to arrest the flow of X-ray further from the X-ray testing machine.


             Fig 1


           Gamma ray test: The short invisible rays given off by radium and radium compounds like cobalt 60 etc. are
           known as gamma rays. These rays penetrate greater thickness of steel than x-rays and the chief advantage of
           this process is portability. This test can be done at places where electricity is not available. These tests are used
           on high quality jobs like boilers and high pressure vessels and pen stock pipes and nuclear vessels.

           X-Ray Tube : A Tungsten filament fixed in a cup shaped cathode is heated by means of a low voltage current.
           Electrons are liberated and they are accelerated by increasing the potential difference between the cathode and
           a slanting edged anode. The place of impingement is made of tungsten to stand the heat as well as to provide
           a metal target of high atomic number. Heat produced is dissipated through the anode and removed by forced o
           natural cooling. The assembly is enclosed in a vacuum
           Pulse Echo Method : In pulse echo method flaws are detected and their sizes estimated by comparing the
           intensity of reflected sound from an interface (either with in the test piece or at the back surface) with the intensity
           of sound reflected from a reference interface of know size or from the back surface (back reflection) serves as
           a reference point for time of flight measurements that enable the depth of some internal flaws to be measured.
           It is necessary that an internal flaw reflect at least part of the sound energy on to the receiving transducer for
           such depth measurements to be made. Most pulse echo systems consist of electronic clock, electronic signal
           generator or pulsar, Ascending transducer, A receiving transducer, An echo signal amplifier, and a display device.
           Through Transmission Method : In Through Transmission method flaws are detected by comparing the intensity
           of ultrasound transmitted through the test piece with the intensity transmitted through a reference standard made
           of the same material. Transmission testing requires two search units, one to transmit the ultrasonic waves and one


                                                           248

                                         CITS : C G & M - Welder - Lesson 83 - 97                                                                               CITS : C G & M - Welder - Lesson 83 - 97

