Page 260 - CITS - Welder - Trade Theory
P. 260
WELDER - CITS


           seconds in the case of iron and steel and for at least 30 seconds in the case of other metals. The diameter of the
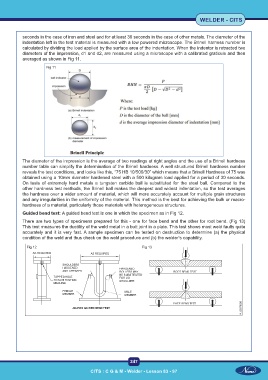
           indentation left in the test material is measured with a low powered microscope. The Brinell harness number is
           calculated by dividing the load applied by the surface area of the indentation. When the indentor is retracted two
           diameters of the impression, d1 and d2, are measured using a microscope with a calibrated graticule and then
           averaged as shown in Fig 11.

                      Fig 11


           The diameter of the impression is the average of two readings at right angles and the use of a Brinell hardness
           number table can simplify the determination of the Brinell hardness. A well structured Brinell hardness number
           reveals the test conditions, and looks like this, “75 HB 10/500/30” which means that a Brinell Hardness of 75 was
           obtained using a 10mm diameter hardened steel with a 500 kilogram load applied for a period of 30 seconds.
           On  tests  of  extremely  hard  metals  a  tungsten  carbide  ball  is  substituted  for  the  steel  ball.  Compared  to  the
           other hardness test methods, the Brinell ball makes the deepest and widest indentation, so the test averages
           the hardness over a wider amount of material, which will more accurately account for multiple grain structures
           and any irregularities in the uniformity of the material. This method is the best for achieving the bulk or macro-
           hardness of a material, particularly those materials with heterogeneous structures.
           Guided bend test: A guided bend test is one in which the specimen as in Fig 12.
           There are two types of specimens prepared for this - one for face bend and the other for root bend. (Fig 13)
           This test measures the ductility of the weld metal in a butt joint in a plate. This test shows most weld faults quite
           accurately and it is very fast. A sample specimen can be tested on destruction to determine (a) the physical
           condition of the weld and thus check on the weld procedure and (b) the welder’s capability.

             Fig 12                                             Fig 13


                                                           247

                                         CITS : C G & M - Welder - Lesson 83 - 97

