Page 147 - CITS - ED - Mechanical
P. 147
ENGINEERING DRAWING - CITS


           Exercise 8.9
           Sketch the views of a hexagonal bolt M10 x 50.
           Proportion of bolt head and other features.
           •  Given bolt diameter = 10 mm (M10).
           •  Bolt head across flat = 1.5d + 3 mm
                                 = 1.5 x 10 + 3 = 18 mm
           •  Bolt head thickness = 0.8d to 0.9d
                                = 0.8 x 10 = 8 mm
           •  Radius of chamfer = 1.5d or 1.4d
           •  Length of bolt = 3d to 4d approx
              in this case = 50 mm.
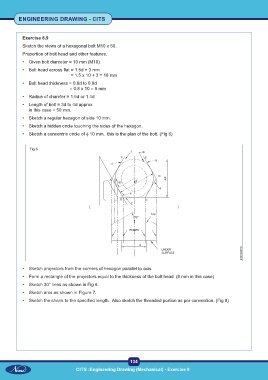
           •  Sketch a regular hexagon of side 10 mm.
           •  Sketch a hidden circle touching the sides of the hexagon.
           •  Sketch a concentric circle of φ 10 mm.  this is the plan of the bolt. (Fig 6)


              Fig 6


           •  Sketch projectors from the corners of hexagon parallel to axis.
           •  Form a rectangle of the projectors equal to the thickness of the bolt head. (8 mm in this case)
           •  Sketch 30° lines as shown in Fig 6.
           •  Sketch arcs as shown in Figure 7.
           •  Sketch the shank to the specified length.  Also sketch the threaded portion as per convention. (Fig 8)


                                                           134
                                   CITS :Engineering Drawing (Mechanical) - Exercise 8

