Page 175 - CITS - ED - Mechanical
P. 175
ENGINEERING DRAWING - CITS


             Fig 4                                               Fig 5


            Collars, taper pins and cotters

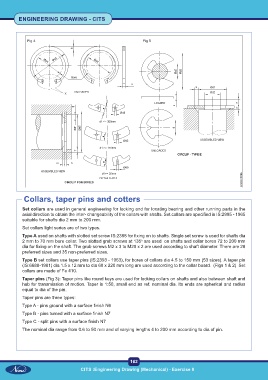
           Set collars are used in general engineering for locking and for locating bearing and other running parts in the
           axial direction to obtain the inter- changeability of the collars with shafts. Set collars are specified in IS:2995 - 1965
           suitable for shafts dia 2 mm to 200 mm.
           Set collars light series are of two types.
           Type A used on shafts with slotted set screw IS:2388 for fixing on to shafts. Single set screw is used for shafts dia
           2 mm to 70 mm bore collar. Two slotted grub screws at 135  are used  on shafts and collar bores 72 to 200 mm
                                                                o
           dia for fixing on the shaft. The grub screws M2 x 3 to M20 x 2 are used according to shaft diameter. There are 28
           preferred sizes and 35 non-preferred sizes.
           Type B set collars use taper pins (IS:2393 - 1963), for bores of collars dia 4.5 to 150 mm (53 sizes). A taper pin
           (IS:6688-1981) dia 1.5 x 12 mm to dia 60 x 220 mm long are used according to the collar board.  (Figs 1 & 2)  Set
           collars are made of Fe 410.
           Taper pins (Fig 3): Taper pins like round keys are used for locking collars on shafts and also between shaft and
           hub for transmission of motion. Taper is 1:50, small end as ref. nominal dia. Its ends are spherical and radius
           equal to dia of the pin.

           Taper pins are three types:
           Type A - pins ground with a surface finish N6
           Type B - pins turned with a surface finish N7
           Type C - split pins with a surface finish N7
           The nominal dia range from 0.6 to 50 mm and of varying lengths 4 to 200 mm according to dia of pin.


                                                           162
                                     CITS :Engineering Drawing (Mechanical) - Exercise 8

