Page 179 - CITS - ED - Mechanical
P. 179
ENGINEERING DRAWING - CITS


           Thickness = 2/3 x W

           Length range = 80 to 360 mm
           Length = 2 x 100 mm = 200 mm
           Width = 28 mm
           Thicknes = 16 mm
           Chamfer S = 0.6 to 0.8 mm
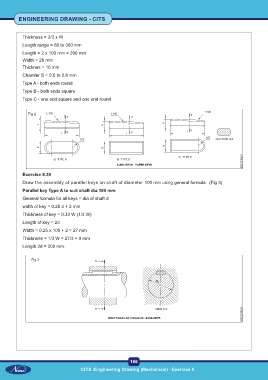
           Type A - both ends round
           Type B - both ends square

           Type C - one end square and one end round


             Fig 2


           Exercise 8.39

           Draw the assembly of parallel keys on shaft of diameter 100 mm using general formula.  (Fig 3)
           Parallel key Type A to suit shaft dia 180 mm
           General formula for all keys = dia of shaft d
           width of key = 0.25 d + 2 mm
           Thickness of key = 0.33 W (1/3 W)

           Length of key = 2d
           Width = 0.25 x 100 + 2 = 27 mm
           Thickness = 1/3 W = 27/3 = 9 mm
           Length 2d = 200 mm.


               Fig 3


                                                           166
                                     CITS :Engineering Drawing (Mechanical) - Exercise 8

