Page 178 - CITS - ED - Mechanical
P. 178
ENGINEERING DRAWING - CITS


            Fasteners


           Exercise 8.37
           Parallel keys
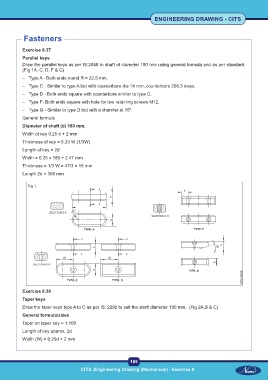
           Draw the parallel keys as per IS:2048 to shaft of diameter 180 mm using general formula and as per standard.
           (Fig 1A, C, D, F & G)

           –  Type A - Both ends round R = 22.5 mm.
           –  Type C - Similar to type A but with counterbore dia 14 mm, counterbore 208.3 deep.
           –  Type D - Both ends square with counterbore similar to type C.
           –  Type F- Both ends square with hole for two retaining screws M12.

           –  Type G - Similar to type D but with a chamfer at 15 .
                                                           0
           General formula
           Diameter of shaft (d) 180 mm.
           Width of key 0.25 d + 2 mm
           Thickness of key = 0.33 W (1/3W)

           Length of key = 2d
           Width = 0.25 x 180 + 2 47 mm
           Thickness = 1/3 W = 47/3 = 16 mm
           Length 2d = 360 mm


             Fig 1


           Exercise 8.38
           Taper keys
           Draw the taper keys type A to C as per IS: 2292 to suit the shaft diameter 100 mm.  (Fig 2A,B & C)
           General formula/sizes

           Taper on taper key = 1:100
           Length of key approx. 2d
           Width (W) = 0.25d + 2 mm


                                                           165
 CITS :Engineering Drawing (Mechanical) - Exercise 8  CITS :Engineering Drawing (Mechanical) - Exercise 8

