Page 228 - CITS - ED - Mechanical
P. 228
ENGINEERING DRAWING - CITS


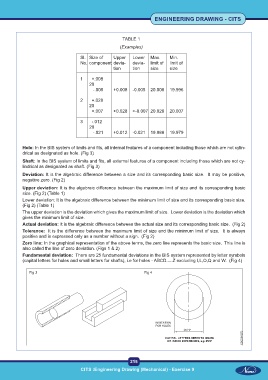
                                                       TABLE 1
                                                      (Examples)

                                     Sl.   Size of   Upper   Lower  Max.    Min.
                                     No.  component  devia-   devia-  limit of   limit of
                                                   tion     tion    size    size

                                     1     +.008
                                         20
                                            -.005   +0.008  -0.005  20.008  19.996

                                     2     +.028
                                         20
                                           +.007   +0.028  +-0.007  20.028  20.007

                                     3     -.012
                                         20
                                            -.021   +0.012  -0.021  19.988  19.979


           Hole: In the BIS system of limits and fits, all internal features of a component including those which are not cylin-
           drical as designated as hole. (Fig 3)
           Shaft: In the BIS system of limits and fits, all external features of a component including those which are not cy-
           lindrical as designated as shaft. (Fig 3)
           Deviation: It is the algebraic difference between a size and its corresponding basic size.  It may be positive,
           negative zero. (Fig 2)
           Upper deviation: It is the algebraic difference between the maximum limit of size and its corresponding basic
           size. (Fig 2) (Table 1)
           Lower deviation: It is the algebraic difference between the minimum limit of size and its corresponding basic size.
           (Fig 2) (Table 1)
           The upper deviation is the deviation which gives the maximum limit of size.  Lower deviation is the deviation which
           gives the minimum limit of size.
           Actual deviation: It is the algebraic difference between the actual size and its corresponding basic size.  (Fig 2)
           Tolerance:  It is the difference between the maximum limit of size and the minimum limit of size.  It is always
           positive and is expressed only as a number without a sign.  (Fig 2)
           Zero line: In the graphical representation of the above terms, the zero line represents the basic size.  This line is
           also called the line of zero deviation. (Figs 1 & 2)
           Fundamental deviation:  There are 25 fundamental deviations in the BIS system represented by letter symbols
           (capital letters for holes and small letters for shafts), i.e for holes - ABCD.....Z excluding I,L,O,Q and W.  (Fig 4)


              Fig 3                                              Fig 4


                                                           215
 CITS :Engineering Drawing (Mechanical) - Exercise 9  CITS :Engineering Drawing (Mechanical) - Exercise 9

