Page 230 - CITS - ED - Mechanical
P. 230
ENGINEERING DRAWING - CITS


           Examples

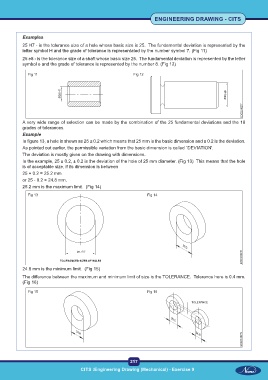
           25 H7 - is the tolerance size of a hole whose basic size is 25.  The fundamental deviation is represented by the
           letter symbol H and the grade of tolerance is representated by the number symbol 7. (Fig 11)
           25 e8 - is the tolerance size of a shaft whose basic size 25.  The fundamental deviation is represented by the letter
           symbol e and the grade of tolerance is represented by the number 8. (Fig 12)

             Fig 11                                         Fig 12


           A very wide range of selection can be made by the combination of the 25 fundamental deviations and the 18
           grades of tolerances.
           Example
           In figure 13, a hole is shown as 25 ± 0.2 which means that 25 mm is the basic dimension and ± 0.2 is the deviation.
           As pointed out earlier, the permissible variation from the basic dimension is called `DEVIATION'.
           The deviation is mostly given on the drawing with dimensions.
           In the example, 25 ± 0.2, ± 0.2 is the deviation of the hole of 25 mm diameter. (Fig 13)  This means that the hole
           is of acceptable size, if its dimension is between
           25 + 0.2 = 25.2 mm
           or 25 - 0.2 = 24.8 mm.
           25.2 mm is the maximum limit.  (Fig 14)
             Fig 13                                               Fig 14


           24.8 mm is the minimum limit.  (Fig 15)
           The difference between the maximum and minimum limit of size is the TOLERANCE.  Tolerance here is 0.4 mm.
           (Fig 16)

             Fig 15                                               Fig 16


                                                           217
 CITS :Engineering Drawing (Mechanical) - Exercise 9  CITS :Engineering Drawing (Mechanical) - Exercise 9

