Page 229 - CITS - ED - Mechanical
P. 229
ENGINEERING DRAWING - CITS


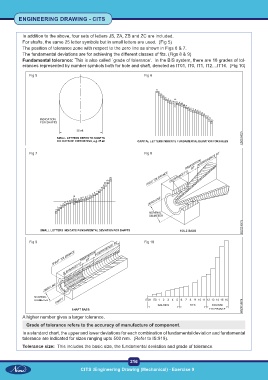
           In addition to the above, four sets of letters JS, ZA, ZB and ZC are included.
           For shafts, the same 25 letter symbols but in small letters are used.  (Fig 5)
           The position of tolerance zone with respect to the zero line as shown in Figs 6 & 7.
           The fundamental deviations are for achieving the different classes of fits. (Figs 8 & 9)
           Fundamental tolerance: This is also called `grade of tolerance'.  In the BIS system, there are 18 grades of tol-
           erances represented by number symbols both for hole and shaft, denoted as IT01, IT0, IT1, IT2....IT16.  (Fig 10)

              Fig 5                                              Fig 6


              Fig 7                                              Fig 8


              Fig 9                                              Fig 10


           A higher number gives a larger tolerance.
             Grade of tolerance refers to the accuracy of manufacture of component.
           In a standard chart, the upper and lower deviations for each combination of fundamental deviation and fundamental
           tolerance are indicated for sizes ranging upto 500 mm.  (Refer to IS:919).
           Tolerance size:  This includes the basic size, the fundamental deviation and grade of tolerance.


                                                           216
                                     CITS :Engineering Drawing (Mechanical) - Exercise 9

