Page 231 - CITS - ED - Mechanical
P. 231
ENGINEERING DRAWING - CITS


           All dimensions of the hole within the tolerance zone are of an acceptable size as shown in Fig 17.
           As per IS:696, while dimensioning the components as a drawing convention, the deviations are expressed as
           tolerances.


              Fig 17


            The Indian standard system of limits
            and fits - Terminology

           Fit: It is the relationship that exists between two mating parts, a hole and a shaft, with respect to their dimensional
           differences before assembly.
           Expression of a fit: A fit is expressed by writing the basic size of the fit first, (the basic size which is common to
           both the hole and the shaft) followed by the symbol for the hole and the symbol for the shaft.

           Example


           30 H7/g6 or 30 H7 - g6 or 30
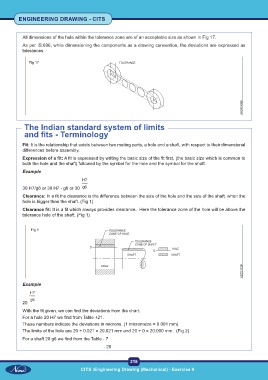
           Clearance: In a fit the clearance is the difference between the size of the hole and the size of the shaft, when the
           hole is bigger than the shaft. (Fig 1)
           Clearance fit: It is a fit which always provides clearance.  Here the tolerance zone of the hole will be above the
           tolerance hole of the shaft. (Fig 1)


               Fig 1


           Example


           20
           With the fit given, we can find the deviations from the chart.
           For a hole 20 H7 we find from Table +21.
           These numbers indicate the deviations in microns. (1 micrometre = 0.001 mm)
           The limits of the hole are 20 + 0.021 = 20.021 mm and 20 + 0 = 20.000 mm.  (Fig 2)
           For a shaft 20 g6 we find from the Table - 7
                                                 - 20


                                                           218
                                     CITS :Engineering Drawing (Mechanical) - Exercise 9

