Page 236 - CITS - ED - Mechanical
P. 236
ENGINEERING DRAWING - CITS


            Geometrical tolerance

           Definition of geometrical tolerance

           Geometrical tolerance is the maximum permissible overall variation of form or position of a feature.
           Reason for using geometrical tolerance
           This will help the operator to produce the components, particularly those parts which must fit together precisely.
           The idea is to have an international system which will overcome the usual language barrier.  This is achieved by
           the use of symbols which represent geometrical characteristics.
           Form: Straightness, flatness, roundness, cylindricity and profile of a line and a surface.
           Attitude: Parallelism, squareness and angularity.
           Location: Position, concentricity and symmetry.
           General principles of geometrical tolerances
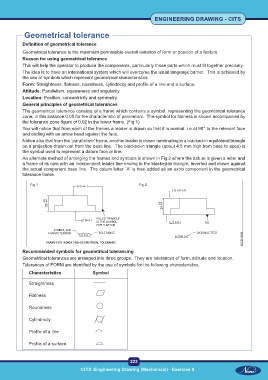
           The geometrical tolerance consists of a frame which contains a symbol, representing the geometrical tolerance
           zone; in this instance 0.05 for the characteristic of parallelism.  The symbol for flatness is shown accompanied by
           the tolerance zone figure of 0.02 in the lower frame. (Fig 1)
           You will notice that from each of the frames a leader is drawn so that it is normal, i.e at 90° to the relevant face
           and ending with an arrow head against the face.
           Notice also that from the `parallelism' frame, another leader is drawn terminating in a blacked-in equilateral triangle
           on a projection drawn out from the base line.  The blacked-in triangle (about 4.5 mm high from base to apex) is
           the symbol used to represent a datum face or line.
           An alternate method of arranging the frames and symbols is shown in Fig 2 where the datum is given a letter and
           a frame of its own with an independent leader line ending in the blacked-in triangle, inverted and drawn against
           the actual component base line.  The datum letter `A' is then added as an extra component in the geometrical
           tolerance frame.

              Fig 1                                            Fig 2


           Recommended symbols for geometrical tolerancing
           Geometrical tolerances are arranged into three groups.  They are tolerances of form, attitude and location.
           Tolerances of FORM are identified by the use of symbols for the following characteristics.

                Characteristics           Symbol

              Straightness

              Flatness

              Roundness


              Cylindricity

              Profile of a line

              Profile of a surface


                                                           223
 CITS :Engineering Drawing (Mechanical) - Exercise 9  CITS :Engineering Drawing (Mechanical) - Exercise 9

