Page 238 - CITS - ED - Mechanical
P. 238
ENGINEERING DRAWING - CITS


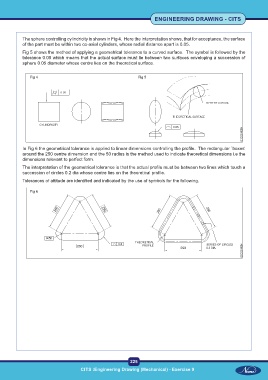
           The sphere controlling cylindricity is shown in Fig 4.  Here the interpretation shows, that for acceptance, the surface
           of the part must be within two co-axial cylinders, whose radial distance apart is 0.05.

           Fig 5 shows the method of applying a geometrical tolerance to a curved surface.  The symbol is followed by the
           tolerance 0.05 which means that the actual surface must lie between two surfaces enveloping a succession of
           sphere 0.05 diameter whose centre lies on the theoretical surface.


              Fig 4                                           Fig 5


           In Fig 6 the geometrical tolerance is applied to linear dimensions controlling the profile.  The rectangular `boxes'
           around the 250 centre dimension and the 50 radius is the method used to indicate theoretical dimensions i.e the
           dimensions relevant to perfect form.

           The interpretation of the geometrical tolerance is that the actual profile must be between two lines which touch a
           succession of circles 0.2 dia whose centre lies on the theoretical profile.
           Tolerances of attitude are identified and indicated by the use of symbols for the following.

              Fig 6


                                                           225
 CITS :Engineering Drawing (Mechanical) - Exercise 9  CITS :Engineering Drawing (Mechanical) - Exercise 9

