Page 239 - CITS - ED - Mechanical
P. 239
ENGINEERING DRAWING - CITS


              Characteristics             Symbol

              Parallelism

              Squareness


              Angularity


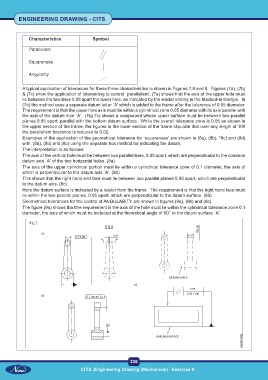
           A typical application of tolerances for these three characteristics is shown in Figures 7,8 and 9.  Figures (7a), (7b)
           & (7c) show the application of tolerancing to control `parallelism'. (7a) shows that the axis of the upper hole must
           lie between the two lines 0.08 apart the lower hole, as indicated by the leader ending in the blacked-in triangle.  In
           (7b) the method uses a separate datum letter `A' which is added to the frame after the tolerance of 0.05 diameter.
           The requirement is that the upper hole axis must lie within a cylindrical zone 0.05 diameter with its axis parallel with
           the axis of the datum hole `A'.  (Fig 7c) shows a component whose upper surface must be between two parallel
           planes 0.05 apart, parallel with the bottom datum surface.  While the overall tolerance zone is 0.05 as shown in
           the upper section of the frame, the figures in the lower section of the frame stipulate that over any length of 100
           the parallelism tolerance is reduced to 0.02.
           Examples of the application of the geometrical tolerance for `squareness' are shown in (8a), (8b), *8c) and (8d)
           with  (8a), (8b) and (8c) using the separate box method for indicating the datum.
           The interpretation is as follows:
           The axis of the vertical hole must be between two parallel lines, 0.05 apart, which are perpendicular to the common
           datum axis `A' of the two horizontal holes. (8a)
           The axis of the upper cylindrical portion must lie within a cylindrical tolerance zone of 0.1 diameter, the axis of
           which is perpendicular to the datum axis `A'. (8b)
           This shows that the right hand end face must lie between two parallel planes 0.05 apart, which are perpendicular
           to the datum axis. (8c)
           Here the datum surface is indicated by a leader from the frame.  The requirement is that the right hand face must
           lie within the two parallel planes, 0.05 apart, which are perpendicular to the datum surface. (8d)
           Geometrical tolerances for the control of ANGULARITY are shown in figures (9a), (9b) and (9c).
           The figure (9a) shows tha tthe requirement is the axis of the hole must lie within the cylindrical tolerance zone 0.1
           diameter, the axis of which must be included at the theoretical angle of 60° to the datum surface `A'.

              Fig 7


                                                           226
                                     CITS :Engineering Drawing (Mechanical) - Exercise 9

