Page 237 - CITS - ED - Mechanical
P. 237
ENGINEERING DRAWING - CITS


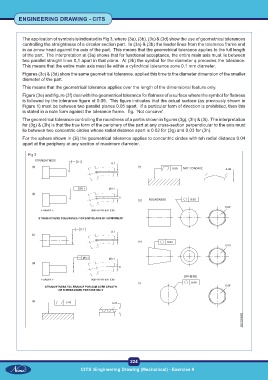
           The application of symbols is indicated in Fig 3, where (3a), (3b), (3c) & (3d) show the use of geometrical tolerances
           controlling the straightness of a circular section part.  In (3a) & (3b) the leader lines from the tolerance frame end
           in an arrow head against the axis of the part.  This means that the geometrical tolerance applies to the full length
           of the part.  The interpretation at (3a) shows that for functional acceptance, the entire main axis must lie between
           two parallel straight lines 0,1 apart in that plane.  At (3b) the symbol for the diameter φ precedes the tolerance.
           This means that the entire main axis must lie within a cylindrical tolerance zone 0.1 mm diameter.

           Figures (3c) & (3d) show the same geometrical tolerance, applied this time to the diameter dimension of the smaller
           diameter of the part.
           This means that the geometrical tolerance applies over the length of the dimensional feature only.

           Figure (3e) and figure (3f) deal with the geometrical tolerance for flatness of a surface where the symbol for flatness
           is followed by the tolerance figure of 0.05.  This figure indicates that the actual surface (as previously shown in
           Figure 1) must be between two parallel planes 0.05 apart.  If a particular form of direction is prohibited, then this
           is stated in a note form against the tolerance frame.  Eg. `Not concave'.
           The geometrical tolerance controlling the roundness of a part is shown in figures (3g), (3h) & (3i).  The interpretation
           for (3g) & (3h) is that the true form of the periphery of the part at any cross-section perpendicular to the axis must
           lie between two concentric circles whose radial distance apart is 0.02 for (3g) and 0.03 for (3h).
           For the sphere shown in (3i) the geometrical tolerance applies to concentric circles with teh radial distance 0.04
           apart at the periphery at any section of maximum diameter.

              Fig 3


                                                           224
                                     CITS :Engineering Drawing (Mechanical) - Exercise 9

