Page 241 - CITS - ED - Mechanical
P. 241
ENGINEERING DRAWING - CITS


              Characteristics             Symbol

              Position


              Concentricity


              Symmetry

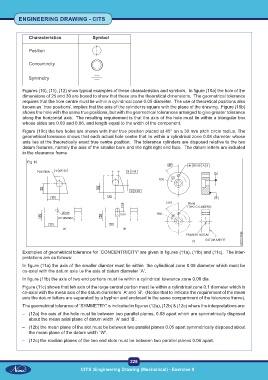
           Figures (10), (11), (12) show typical examples of these characteristics and symbols.  In figure (10a) the hole of the
           dimensions of 25 and 30 are boxed to show that these are the theoretical dimensions.  The geometrical tolerance
           requires that the hole centre must lie within a cylindrical zone 0.05 diameter.  The use of theoretical positions also
           known as `true positions', implies that the axis of the cylinder is square with the plane of the drawing.  Figure (10b)
           shows the hole with the same true positions, but with the geometrical tolerances arranged to give greater tolerance
           along the horizontal axis.  The resulting requirement is that the axis of the hole must lie within a triangular box
           whose sides are 0.03 and 0.06, and length equal to the width of the component.
           Figure (10c) the two holes are shown with their true position placed at 45° on a 30 mm pitch circle radius. The
           geometrical tolerance shows that each actual hole centre that lie within a cylindrical zone 0.08 diameter whose
           axis lies at the theoretically exact true centre position.  The tolerance cylinders are disposed relative to the two
           datum features, namely the axis of the smaller bore and the right right end face.  The datum letters are included
           in the clearance frame.

             Fig 10


           Examples of geometrical tolerance for `CONCENTRICITY' are given in figures (11a), (11b) and (11c).  The inter-
           pretations are as follows:

           In figure (11a) the axis of the smaller diamter must lie within  the cylindrical zone 0.08 diameter which must be
           co-axial with the datum axis i.e the axis of datum diameter `A'.
           In figure (11b) the axis of two end portions must lie within a cylindrical tolerance zone 0.08 dia.

           Figure (11c) shows that teh axis of the large central portion must lie within a cylindrical zone 0.1 diameter which is
           co-axial with the mean axis of the datum diameters `A' and `B'.  (Notice that to indicate the requirement of the mean
           axis the datum letters are separated by a hyphen and enclosed in the same compartment of the tolerance frame).
           The geometrical tolerance of `SYMMETRY' is indicated in figures (12a), (12b) & (12c) where the interpretations are:
           –  (12a) the axis of the hole must lie between two parallel planes, 0.08 apart which are symmetrically disposed
              about the mean axial plane of datum width `A' and `B'.
           –  (12b) the mean plane of the slot must be between two parallel planes 0.05 apart symmetrically disposed about
              the mean plane of the datum width `W'.
           –  (12c) the median planes of the two end slots must be between two parallel planes 0.06 apart.


                                                           228
                                     CITS :Engineering Drawing (Mechanical) - Exercise 9

