Page 240 - CITS - ED - Mechanical
P. 240
ENGINEERING DRAWING - CITS


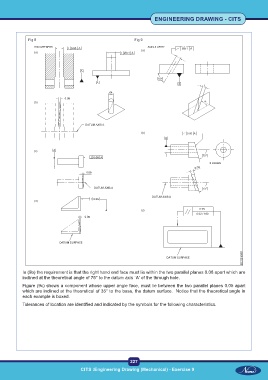
              Fig 8                                          Fig 9


           In (9b) the requirement is that the right hand end face must lie within the two parallel planes 0.08 apart which are
           inclined at the theoretical angle of 75° to the datum axis `A' of the through hole.
           Figure (9c) shows a component whose upper angle face, must lie between the two parallel planes 0.05 apart
           which are inclined at the theoretical of 35° to the base, the datum surface.  Notice that the theoretical angle in
           each example is boxed.
           Tolerances of location are identified and indicated by the symbols for the following characteristics.


                                                           227
 CITS :Engineering Drawing (Mechanical) - Exercise 9  CITS :Engineering Drawing (Mechanical) - Exercise 9

