Page 309 - CITS - ED - Mechanical
P. 309
ENGINEERING DRAWING - CITS


            CAD basics


           The CAD Database and the user coordinate system
           Designs and drawings created in a CAD system are usually defined and stored using sets of points in what is called
           world space. In most CAD systems, the world space is defined using a three-dimensional  Cartesian coordinate
           system. Three mutually perpendicular axes, usually referred to as the X-, Y-, and Z-axes, define this system. The
           intersection of the three coordinate axes forms a point called the origin. Any point in world space can then be
           defined as the distance from the origin in the X-, Y- and Z- directions. In most CAD systems, the directions of the
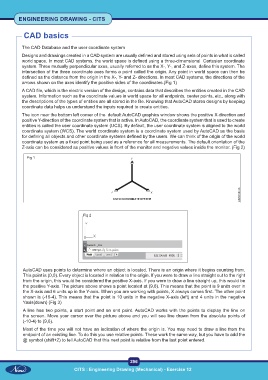
           arrows shown on the axes identify the positive sides of the coordinates.(Fig 1)
           A CAD file, which is the electric version of the design, contains data that describes the entities created in the CAD
           system. Information such as the coordinate values in world space for all endpoints, center points, etc., along with
           the descriptions of the types of entities are all stored in the file. Knowing that AutoCAD stores designs by keeping
           coordinate data helps us understand the inputs required to create entities.
           The icon near the bottom left corner of the  default AutoCAD graphics window shows the positive X-direction and
           positive Y-direction of the coordinate system that is active. In AutoCAD, the coordinate system that is used to create
           entities is called the user coordinate system (UCS). By default, the user coordinate system is aligned to the world
           coordinate system (WCS). The world coordinate system is a coordinate system used by AutoCAD as the basis
           for defining all objects and other coordinate systems defined by the users. We can think of the origin of the world
           coordinate system as a fixed point being used as a reference for all measurements. The default orientation of the
           Z-axis can be considered as positive values in front of the monitor and negative values inside the monitor. (Fig 2)

             Fig 1


                                      Fig 2


           AutoCAD uses points to determine where an object is located. There is an origin where it begins counting from.
           This point is (0,0). Every object is located in relation to the origin. If you were to draw a line straight out to the right
           from the origin, this would be considered the positive X-axis. If you were to draw a line straight up, this would be
           the positive Y-axis. The picture above shows a point located at (9,6). This means that the point is 9 units over in
           the X-axis and 6 units up in the Y-axis. When you are working with points, X always comes first. The other point
           shown is (-10-4). This means that the point is 10 units in the negative X-axis (left) and 4 units in the negative
           Yaxis(down) (Fig 3)
           A line has two points, a start point and an end point. AutoCAD works with the points to display the line on
           the screen. Move your cursor over the picture above and you will see line drawn from the absolute points of
           (-10-4) to (9,6).
           Most of the time you will not have an indication of where the origin is. You may need to draw a line from the
           endpoint of an existing line. To do this you use relative points. These work the same way, but you have to add the
           @ symbol (shift+2) to tell AutoCAD that this next point is relative from the last point entered.


                                                           296
                                  CITS : Engineering Drawing (Mechanical) - Exercise 12

