Page 37 - CITS - ED - Mechanical
P. 37
ENGINEERING DRAWING - CITS


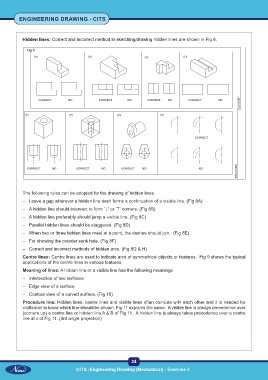
           Hidden lines: Correct and incorrect method in sketching/drawing hidden lines are shown in Fig 8.

             Fig 8


           The following rules can be adopted for the drawing of hidden lines.
           –  Leave a gap wherever a hidden line dash forms a continuation of a visible line. (Fig 8A)
           –  A hidden line should intersect to form `L' or `T' corners. (Fig 8B)
           –  A hidden line preferably should jump a visible line. (Fig 8C)
           –  Parallel hidden lines should be staggered. (Fig 8D)

           –  When two or three hidden lines meet at a point, the dashes should join.  (Fig 8E)
           –  For showing the counter sunk hole. (Fig 8F)
           –  Correct and incorrect methods of hidden arcs. (Fig 8G & H)
           Centre lines: Centre lines are used to indicate arcs of symmetrical objects or features.  Fig 9 shows the typical
           applications of the centre lines in various features.
           Meaning of lines: A hidden line or a visible line has the following meanings
           –  Intersection of two surfaces
           –  Edge view of a surface

           –  Contour view of a curved surface. (Fig 10)
           Procedure line: Hidden lines, centre lines and visible lines often coincide with each other and it is needed for
           craftsman to know which line should be shown. Fig 11 explains the same.  A visible line is always precedence over
           (corners up) a centre line or hidden line A & B of Fig 11.  A hidden line is always takes precedence over a centre
           line at c of Fig 11. (3rd angle projection)


                                                           24
                                   CITS :Engineering Drawing (Mechanical) - Exercise 3

