Page 40 - CITS - ED - Mechanical
P. 40
ENGINEERING DRAWING - CITS


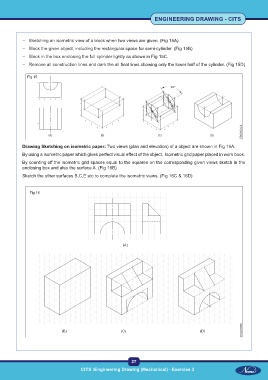
           –  Sketching an isometric view of a block when two views are given. (Fig 15A)

           –  Block the given object, including the rectangular space for semi-cylinder. (Fig 15B)
           –  Block in the box enclosing the full cylinder lightly as shown in Fig 15C.
           –  Remove all construction lines and dark the all final lines showing only the lower half of the cylinder. (Fig 15D)


             Fig 15


           Drawing Sketching on isometric paper: Two views (plan and elevation) of a object are shown in Fig 16A.
           By using a isometric paper which gives perfect visual effect of the object.  Isometric grid paper placed in work book.
           By counting off the isometric grid spaces equal to the squares on the corresponding given views sketch in the
           enclosing box and also the surface A. (Fig 16B)
           Sketch the other surfaces B,C,E etc to complete the isometric views. (Fig 16C & 16D)


              Fig 16


                                                           27
                                     CITS :Engineering Drawing (Mechanical) - Exercise 3

