Page 39 - CITS - ED - Mechanical
P. 39
ENGINEERING DRAWING - CITS


           Type of sketches
           In technical drawing sketching the figures are prepared from three dimensional objects.  The form of the drawing
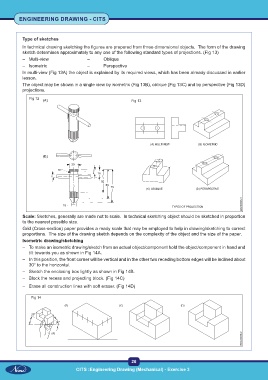
           sketch determines approximately to any one of the following standard types of projections. (Fig 13)
           –  Multi-view                –      Oblique
           –  Isometric                 –      Perspective
           In multi-view (Fig 13A) the object is explained by its required views, which has been already discussed in earlier
           lesson.
           The object may be shown in a single view by isometric (Fig 13B), oblique (Fig 13C) and by perspective (Fig 13D)
           projections.
              Fig 12
                                                           Fig 13


           Scale: Sketches, generally are made not to scale.  In technical sketching object should be sketched in proportion
           to the nearest possible size.
           Grid (Cross-section) paper provides a ready scale that may be employed to help in drawing/sketching to correct
           proportions.  The size of the drawing sketch depends on the complexity of the object and the size of the paper.
           Isometric drawing/sketching
           –  To make an isometric drawing/sketch from an actual object/component hold the object/component in hand and
              tilt towards you as shown in Fig 14A.
           –  In this position, the front corner will be vertical and in the other two receding bottom edges will be inclined about
              30° to the horizontal.
           –  Sketch the enclosing box lightly as shown in Fig 14B.
           –  Block the recess and projecting block. (Fig 14C)
           –  Erase all construction lines with soft eraser. (Fig 14D)


               Fig 14


                                                           26
                                   CITS :Engineering Drawing (Mechanical) - Exercise 3

